How a Computer Boots Up (Step by Step)
Turning on a computer is something most of us do without thinking. You press the power button, wait a few seconds, and your desktop appears, ready for work, gaming, studying, or browsing the internet.
What seems like a simple process is actually a carefully coordinated sequence of events happening behind the scenes. Before you can open a web browser or launch your favorite app, your computer has to power its hardware, check that everything is working properly, load its operating system, and prepare every component to work together.
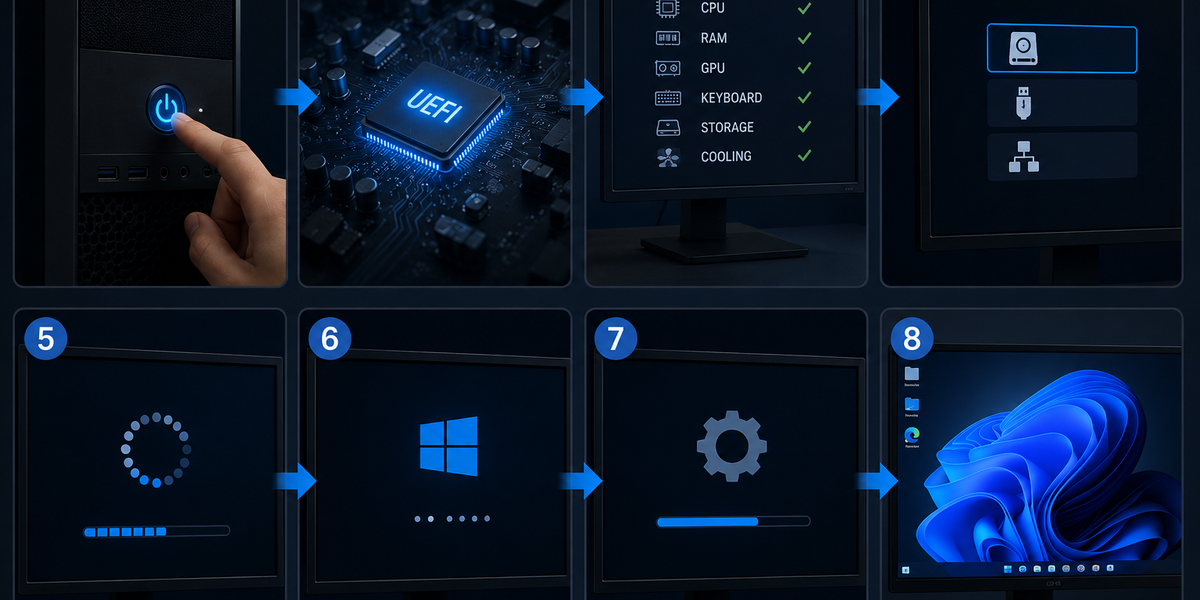
The entire process usually takes less than a minute, yet hundreds of tasks happen during that time. Here’s a simple step-by-step explanation of how your computer boots up.
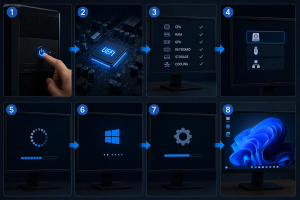
Step 1: The power button starts everything
The boot process begins the moment you press the power button.
This sends a signal to the computer’s power supply, which begins delivering electricity to the motherboard, processor, memory, storage drive, graphics hardware, and other internal components.
At this stage, the computer isn’t running any programs yet. It’s simply providing power to all the hardware that needs to wake up.
You can think of it like turning the key in a car. Before you can drive away, the engine first needs to start.
Step 2: The firmware takes control
Once the hardware has power, the computer doesn’t immediately load Windows or macOS.
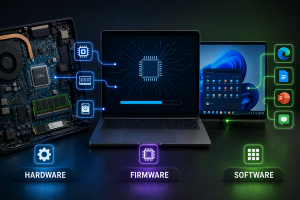
Instead, a small built-in program called firmware starts first.
Modern computers use UEFI (Unified Extensible Firmware Interface), while older systems use BIOS (Basic Input/Output System).
Unlike the operating system, firmware is permanently stored on a chip attached to the motherboard. That means it’s always available, even if no operating system is installed.
Its first responsibility is to prepare the computer for startup.
Step 3: The hardware is checked
Before moving any further, the firmware performs a quick inspection known as the Power-On Self-Test (POST).
During this process, the computer checks whether its essential hardware is functioning correctly.
Among the components it tests are:
- The processor (CPU)
- RAM (memory)
- Graphics hardware
- Keyboard
- Storage drives
- Cooling systems
If something important isn’t working properly, the computer may display an error message, make a series of beep sounds, or stop the startup process altogether.
Fortunately, on a healthy computer, this check usually takes only a few seconds.
Step 4: The computer finds the operating system
Once the hardware passes its tests, the firmware searches for a device that contains an operating system.
This is called the boot device.
For most people, that’s the internal SSD or hard drive. However, computers can also boot from USB drives, DVDs (on older systems), or even network servers in some business environments.
The firmware follows a predefined boot order until it finds a device that contains a valid operating system.
Once it does, it passes control to that device.
Step 5: The bootloader gets to work
The operating system doesn’t load directly.
Instead, a small program called the bootloader starts first.
Its job is to locate the operating system files stored on the drive and begin loading them into memory.
Different operating systems use different bootloaders. Windows uses the Windows Boot Manager, while many Linux systems use GRUB.
Although most users never notice it, the bootloader is an essential link between the firmware and the operating system.
Without it, your computer wouldn’t know how to launch Windows, macOS, or Linux.
Step 6: The operating system loads
Now the main operating system begins loading.
Thousands of files are transferred from storage into RAM so the computer can access them quickly.
One of the first components to load is the kernel, which is the core of the operating system. The kernel manages communication between hardware and software, allocates memory, controls running programs, and coordinates nearly everything happening inside the computer.
At the same time, device drivers begin loading.
Drivers allow the operating system to communicate with hardware such as your graphics card, speakers, printer, Wi-Fi adapter, webcam, and keyboard.
Without drivers, many of your computer’s features wouldn’t function correctly.
Step 7: Background services start
Once the operating system is running, it begins launching background services and startup applications.
These may include:
- Antivirus software
- Bluetooth services
- Cloud storage synchronization
- Audio controls
- Security tools
- Software update services
Some programs are designed to launch automatically every time your computer starts.
If too many applications are configured to run at startup, they can noticeably increase boot time. That’s one reason older computers often seem slower after years of use.
Step 8: Your desktop appears
Finally, the login screen or desktop appears.
After you sign in, your personal settings, files, and preferences load. Any remaining background services continue starting while you begin using your computer.
At this point, the boot process is complete.
Everything is now ready—from opening documents and browsing the web to editing photos or playing games.
Why modern computers boot so much faster
If you’ve been using computers for many years, you’ve probably noticed how dramatically startup times have improved.
The biggest reason is the widespread adoption of Solid-State Drives (SSDs). Unlike traditional hard drives, SSDs have no moving parts, allowing them to access files much more quickly.
Modern processors, faster memory, optimized operating systems, and improvements in firmware have also helped reduce startup times.
Many computers that once needed several minutes to become usable can now boot in less than 20 seconds.
A remarkable process you rarely notice
Booting a computer feels effortless because all the complicated work happens behind the scenes.
In just a few moments, your computer powers its hardware, checks every critical component, loads firmware, launches the bootloader, starts the operating system, activates device drivers, and prepares your personal workspace.
It’s a process involving hundreds of individual operations that must happen in exactly the right order.
The next time you press the power button, remember that your computer isn’t simply “turning on.” It’s performing an incredibly complex startup sequence that transforms a collection of electronic components into the powerful machine you rely on every day.